
Comparing Force Ratios to Casualty Exchange Ratios
Christopher A. Lawrence
[The article below is reprinted from the Summer 2009 edition of The International TNDM Newsletter.]
There are three versions of force ratio versus casualty exchange ratio rules, such as the three-to-one rule (3-to-1 rule), as it applies to casualties. The earliest version of the rule as it relates to casualties that we have been able to find comes from the 1958 version of the U.S. Army Maneuver Control manual, which states: “When opposing forces are in contact, casualties are assessed in inverse ratio to combat power. For friendly forces advancing with a combat power superiority of 5 to 1, losses to friendly forces will be about 1/5 of those suffered by the opposing force.”[1]
The RAND version of the rule (1992) states that: “the famous ‘3:1 rule ’, according to which the attacker and defender suffer equal fractional loss rates at a 3:1 force ratio the battle is in mixed terrain and the defender enjoys ‘prepared ’defenses…” [2]
Finally, there is a version of the rule that dates from the 1967 Maneuver Control manual that only applies to armor that shows:
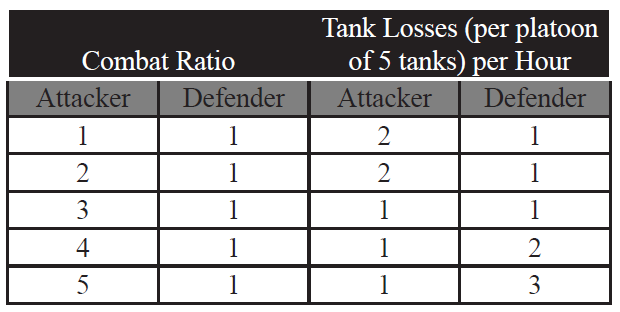 As the RAND construct also applies to equipment losses, then this formulation is directly comparable to the RAND construct.
Therefore, we have three basic versions of the 3-to-1 rule as it applies to casualties and/or equipment losses. First, there is a rule that states that there is an even fractional loss ratio at 3-to-1 (the RAND version), Second, there is a rule that states that at 3-to-1, the attacker will suffer one-third the losses of the defender. And third, there is a rule that states that at 3-to-1, the attacker and defender will suffer the same losses as the defender. Furthermore, these examples are highly contradictory, with either the attacker suffering three times the losses of the defender, the attacker suffering the same losses as the defender, or the attacker suffering 1/3 the losses of the defender.
Therefore, what we will examine here is the relationship between force ratios and exchange ratios. In this case, we will first look at The Dupuy Institute’s Battles Database (BaDB), which covers 243 battles from 1600 to 1900. We will chart on the y-axis the force ratio as measured by a count of the number of people on each side of the forces deployed for battle. The force ratio is the number of attackers divided by the number of defenders. On the x-axis is the exchange ratio, which is a measured by a count of the number of people on each side who were killed, wounded, missing or captured during that battle. It does not include disease and non-battle injuries. Again, it is calculated by dividing the total attacker casualties by the total defender casualties. The results are provided below:
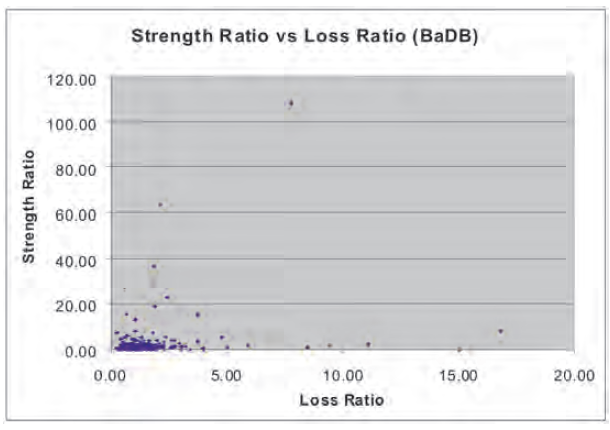 As can be seen, there are a few extreme outliers among these 243 data points. The most extreme, the Battle of Tippennuir (l Sep 1644), in which an English Royalist force under Montrose routed an attack by Scottish Covenanter militia, causing about 3,000 casualties to the Scots in exchange for a single (allegedly self-inflicted) casualty to the Royalists, was removed from the chart. This 3,000-to-1 loss ratio was deemed too great an outlier to be of value in the analysis.
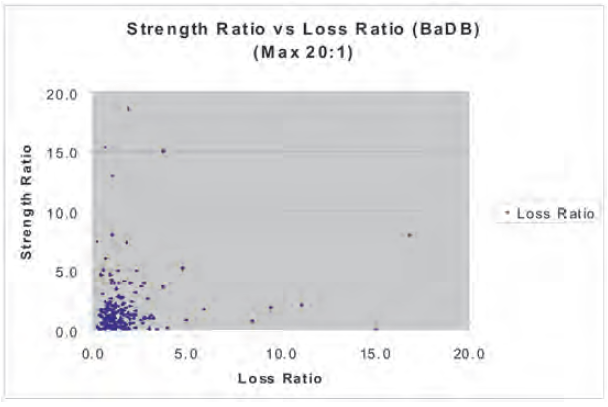 As it is, the vast majority of cases are clumped down into the corner of the graph with only a few scattered data points outside of that clumping. If one did try to establish some form of curvilinear relationship, one would end up drawing a hyperbola. It is worthwhile to look inside that clump of data to see what it shows. Therefore, we will look at the graph truncated so as to show only force ratios at or below 20-to-1 and exchange rations at or below 20-to-1.
 Again, the data remains clustered in one corner with the outlying data points again pointing to a hyperbola as the only real fitting curvilinear relationship. Let’s look at little deeper into the data by truncating the data on 6-to-1 for both force ratios and exchange ratios. As can be seen, if the RAND version of the 3-to-1 rule is correct, then the data should show at 3-to-1 force ratio a 3-to-1 casualty exchange ratio. There is only one data point that comes close to this out of the 243 points we examined.
If the FM 105-5 version of the rule as it applies to armor is correct, then the data should show that at 3-to-1 force ratio there is a 1-to-1 casualty exchange ratio, at a 4-to-1 force ratio a 1-to-2 casualty exchange ratio, and at a 5-to-1 force ratio a 1-to-3 casualty exchange ratio. Of course, there is no armor in these pre-WW I engagements, but again no such exchange pattern does appear.
If the 1958 version of the FM 105-5 rule as it applies to casualties is correct, then the data should show that at a 3-to-1 force ratio there is 0.33-to-1 casualty exchange ratio, at a 4-to-1 force ratio a .25-to-1 casualty exchange ratio, and at a 5-to-1 force ratio a 0.20-to-5 casualty exchange ratio. As can be seen, there is not much indication of this pattern, or for that matter any of the three patterns.
Still, such a construct may not be relevant to data before 1900. For example, Lanchester claimed in 1914 in Chapter V, “The Principal of Concentration,” of his book Aircraft in Warfare, that there is greater advantage to be gained in modern warfare from concentration of fire.[3] Therefore, we will tap our more modern Division-Level Engagement Database (DLEDB) of 675 engagements, of which 628 have force ratios and exchange ratios calculated for them. These 628 cases are then placed on a scattergram to see if we can detect any similar patterns.
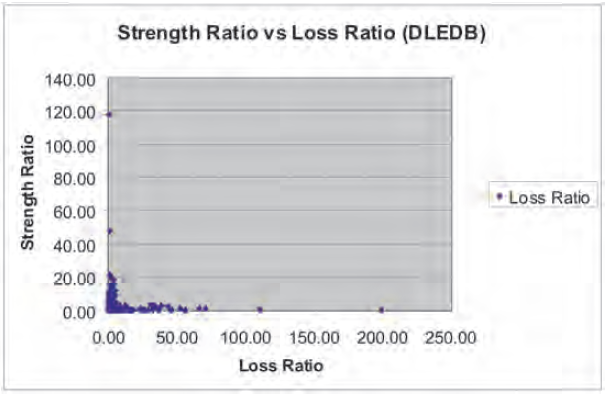 Even though this data covers from 1904 to 1991, with the vast majority of the data coming from engagements after 1940, one again sees the same pattern as with the data from 1600-1900. If there is a curvilinear relationship, it is again a hyperbola. As before, it is useful to look into the mass of data clustered into the corner by truncating the force and exchange ratios at 20-to-1. This produces the following:
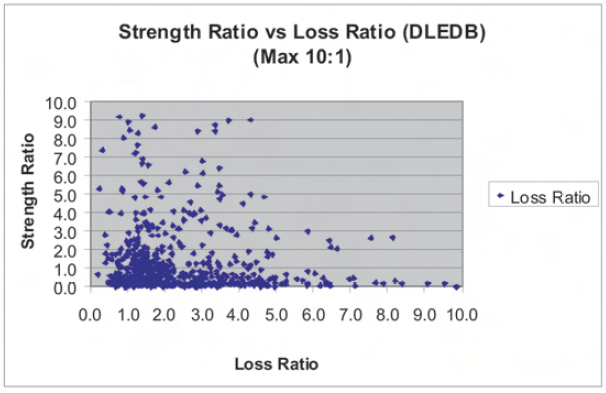
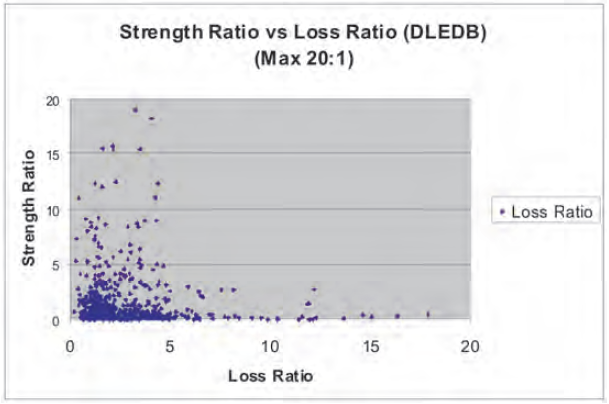 Again, one sees the data clustered in the corner, with any curvilinear relationship again being a hyperbola. A look at the data further truncated to a 10-to-1 force or exchange ratio does not yield anything more revealing.
 And, if this data is truncated to show only 5-to-1 force ratio and exchange ratios, one again sees:
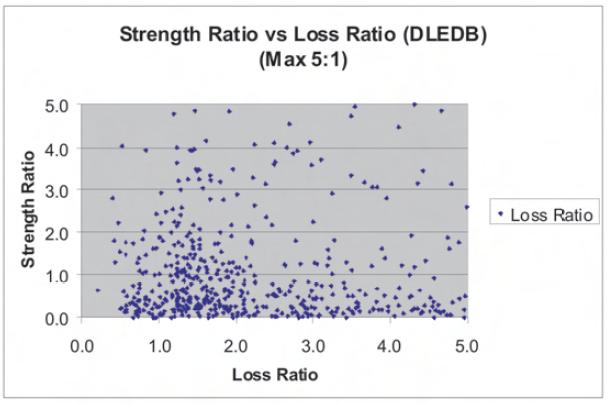 Again, this data appears to be mostly just noise, with no clear patterns here that support any of the three constructs. In the case of the RAND version of the 3-to-1 rule, there is again only one data point (out of 628) that is anywhere close to the crossover point (even fractional exchange rate) that RAND postulates. In fact, it almost looks like the data conspires to make sure it leaves a noticeable “hole” at that point. The other postulated versions of the 3-to-1 rules are also given no support in these charts.
Also of note, that the relationship between force ratios and exchange ratios does not appear to significantly change for combat during 1600-1900 when compared to the data from combat from 1904-1991. This does not provide much support for the intellectual construct developed by Lanchester to argue for his N-square law.
While we can attempt to torture the data to find a better fit, or can try to argue that the patterns are obscured by various factors that have not been considered, we do not believe that such a clear pattern and relationship exists. More advanced mathematical methods may show such a pattern, but to date such attempts have not ferreted out these alleged patterns. For example, we refer the reader to Janice Fain’s article on Lanchester equations, The Dupuy Institute’s Capture Rate Study, Phase I & II, or any number of other studies that have looked at Lanchester.[4]
The fundamental problem is that there does not appear to be a direct cause and effect between force ratios and exchange ratios. It appears to be an indirect relationship in the sense that force ratios are one of several independent variables that determine the outcome of an engagement, and the nature of that outcome helps determines the casualties. As such, there is a more complex set of interrelationships that have not yet been fully explored in any study that we know of, although it is briefly addressed in our Capture Rate Study, Phase I & II.
NOTES
[1] FM 105-5, Maneuver Control (1958), 80.
[2] Patrick Allen, “Situational Force Scoring: Accounting for Combined Arms Effects in Aggregate Combat Models,” (N-3423-NA, The RAND Corporation, Santa Monica, CA, 1992), 20.
[3] F. W. Lanchester, Aircraft in Warfare: The Dawn of the Fourth Arm (Lanchester Press Incorporated, Sunnyvale, Calif., 1995), 46-60. One notes that Lanchester provided no data to support these claims, but relied upon an intellectual argument based upon a gross misunderstanding of ancient warfare.
[4] In particular, see page 73 of Janice B. Fain, “The Lanchester Equations and Historical Warfare: An Analysis of Sixty World War II Land Engagements,” Combat Data Subscription Service (HERO, Arlington, Va., Spring 1975).
